
Our heroes left Sadda the Sage's cave and went back to the Titan's Pass. It turns out there was a nice battle axe and helmet in a room south of where the Titan used to stand. In any case, it was back to the Earth Cavern to smash the slab.
 Considering every little event in this game thus far has been jazzed up from the original, I expected fireworks and explosions when smashing the slab behind the vampire's throne room. Instead, the slab just kind of disappeared without even a message.
The heroes traveled deeper into the dungeon, encountering new enemies like trolls and ogre magi. At the very end of it all, they entered a room with an orb.
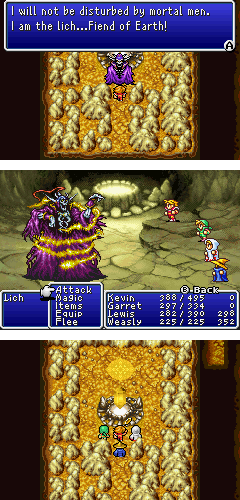
In the original game, the heroes held orbs, not crystals. So when they defeated a fiend, their orb would light up. Here, the game retained the orbs, but also added a crystal in the room. The orb transformed into the Fiend of Earth, Lich, and the battle began.
The battle was much easier than the NES version, despite the fact that he had more HP. The trick was to have my white mage cast NulShock to halve all of Lich's lightning attacks. This meant every single time he cast an area spell, I could counter with the healara spell and recover all of the lost HP. I boosted my fighter with temper and haste, and depended on him to deal all the damage. Lich cast haste on himself, but then proceeded to use zero physical attacks. Go fig.
After defeating Lich, the Warriors of Light lifted a shard of crystal and restored the light to the crystal in the cave. Then, they walked into the glowing circle in the back of the room and were transported back to the overworld.
In the original game, it was unclear where you had to go after defeating Lich. You were expected to be a good little explorer and take Bikke's ship around the world until you found a new dock. Here, not much has changed. The Earthgift Shrine opened up, thanks to a short cutscene, but I didn't want to visit it yet. So based on my recollection, I sailed southeast to Crescent Lake.
 The monsters here was essentially taken from the previous dungeon. There were bands of trolls and some hill gigas encounters. I also encountered ankhegs, which reminded me of the other game I'm currently playing: Baldur's Gate.
The more I play this game, the more I'm convinced that the creators lifted all the monsters straight out of a Dungeons and Dragons monster manual. And when you consider that the leader of the good dragons is Bahamut, and the evil dragon is Tiamat, it makes all the more sense.
Crescent Lake looked as beautiful as ever, although I didn't remember it being so desolate. In the north part of town, near the gravestones, we met up with a woman complaining about her husband, sleeping. Traveling further north, I found the husband. Sure enough, he was sleeping. Compared to Melmond, it felt like Crescent Lake was the one with the epidemic. An epidemic of monotony.
We bought upgraded weapons for my fighter. Sadly, the heaviest thing my spell casters had on were leather gloves... still. We then headed east, through the grove of pine trees, to meet with the sages.
As in the original, there was no indication that the sages were far at the edge of town. The only clue that something in the town wasn't what it seemed was a message back in Cornelia about Lukhan's prophecy. Even then, nothing in the original identified the town as Crescent Lake. You had to look at the shape of the body of water on the world map and figure it out for yourself. Ah, those were the days.
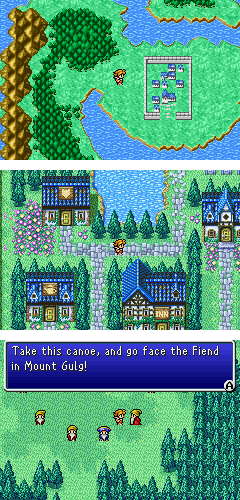
The sages gave me a canoe and pseudo-blamed me for releasing Marilith, the Fiend of Fire. Apparently, when we killed Lich and um... you know... saved the earth from rotting away, there was an earthquake. Marilith woke up from a deep sleep and is now super pissed off. Thanks.
One of the sages also told a foreboding tale about the northern civilizations falling into ruin at the hands of the combined might of the Fiend of Wind and the Fiend of Water. They sent huge typhoons that plunged everybody into the dark ages. Oh good. I have to fight them later.
The spells in Crescent Lake were too expensive, so I decided to hold off on my magical shopping spree until after taking care of the Fire Fiend. Along the way, I saw some familiar enemies. The piranhas would later make appearances in Final Fantasy VI, during the scene where Sabin jumps off the waterfall. The Ochu showed up in later games as well, its big mouth spewing toxins and such.
 I spent some time exploring the channels but in the end got tired of spamming thundara and headed to Gulg Volcano. Just as in the original, our heroes had to walk through pools of lava to get to the bottom floor. The first few floors revealed an awful truth to me: I had just wasted a lot of gil buying mythril equipment that I could have gotten for free. It also gave my fighter a great sword, which was designed to fell giants.
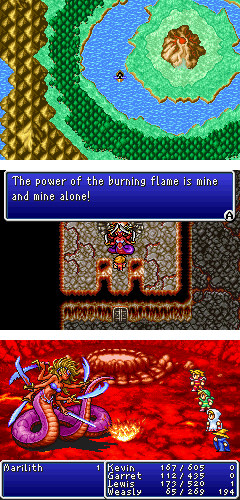
Down, down the heroes traveled, battling lava worms, pyrolisks, and fire elementals. The final floor was segmented into 9 corridors (similar to the first level of the Earth Cavern). Marilith was in the bottom left one. But first, I went down the left to get some flame-resistant armor for my fighter. At least, I hope it was flame- resistant and not ice-resistant in a wacky reverse element sort of way.
Marilith gave the typical spiel about evil triumphing over good and her personal goal of setting the world ablaze. She proved tougher than Lich to handle. But this was due to the fact that my white mage was critically low on MP thanks to the gradual wearing down of healing items from the lava-filled trek. The only thing I cast was NulBlaze, to halve all fire damage, and the rest of the time, I had the white mage attack with his hammer. My black mage spent the entire battle casting support magic on the thief and fighter. As for the fighter and thief, their job was to wail on Marilith until she was dead.
Unfortunately, the final fira spell knocked my black mage unconscious. I couldn't revive him in time with a Phoenix Down, so he ended up not getting any experience from the battle. Other than that, it was a job well done. The second crystal was restored and the heroes warped back to the overworld.
 For a moment, I almost didn't get to play Final Fantasy on my flight. You see, my flight was slated to depart at 7:50p on a Friday, so I left work in a hurry and completely forgot to undock my laptop from the workstation. It wasn't until I reached the airport that I realized my backpack felt suspiciously light. With my flight a mere 50 minutes away, I called my girlfriend (who had just dropped me off at the airport) for help. Her kind soul braved the heat wave and tedium and drove all the way back to work, picked up my computer, and dropped it off to me outside Terminal A. I then dashed back through security and made it onto the plane just before they closed the doors.
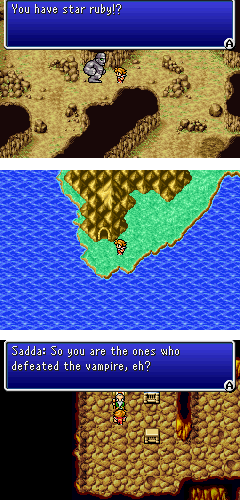 Behind the vampire's room, our heroes noticed a slab and evil energy emanated from beneath it. Whatever was rotting the earth had not gone away with the death of the vampire. It was still waiting. Try as they might, the slab could not be moved.